 Durable Machinery
Get Price
10 Common Problems in Clay Brick Production and How to Solve Them
Many clay brick factories lose money through production defects rather than weak market demand. Cracked green bricks, uneven dimensions, poor drying, weak fired products, chemical defects, and excessive fuel use can reduce saleable output even when the forming equipment appears to run normally.
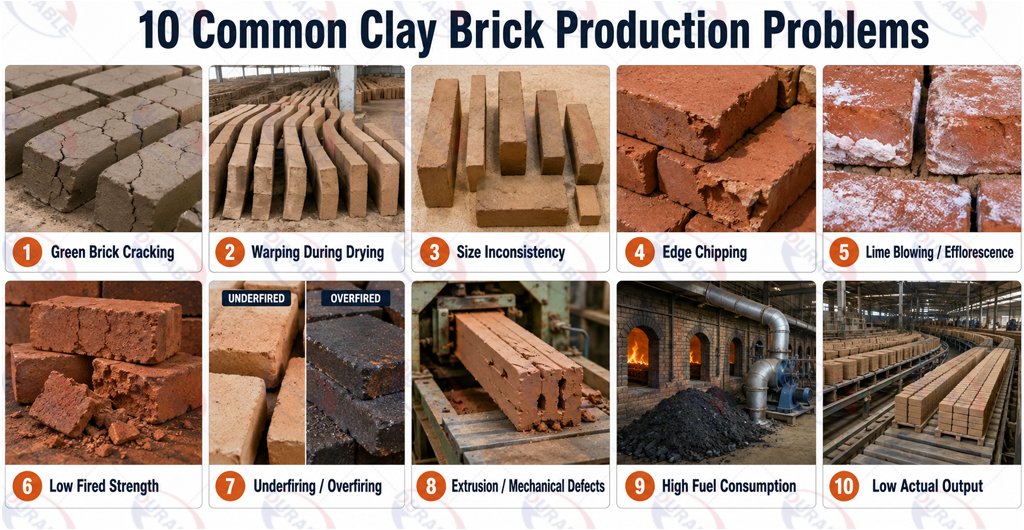
The difficult part is that one visible defect may have several causes. A crack can begin with unsuitable clay preparation, incorrect moisture, worn molds, fast drying, poor kiln control, or rough handling.
Therefore, effective troubleshooting requires a complete view of clay preparation, forming, cutting, drying, handling, firing, and quality control.
This guide explains 10 common clay brick production problems, their likely causes, practical fixes, and prevention tips to help you reduce waste and improve saleable output.
Problem 1: Green Bricks Crack After Forming
What you will see
Cracks may appear immediately after forming, during early drying, or along the edges and corners of the green brick. Some cracks are obvious, while fine cracks may only become visible after firing.
Most likely causes
- Clay moisture is too low.
- Moisture is distributed unevenly.
- Clay contains stones, roots, hard lumps, or oversized particles.
- Mixing time is insufficient.
- The clay has excessive shrinkage.
- Forming pressure is too high.
- Bricks are exposed to strong sun, wind, or heat too early.
- The mold or die creates internal stress.
How to fix it
First, check whether moisture is consistent throughout the clay mixture. Adding water only at the final stage may create wet and dry areas inside the same batch.
Next, inspect the clay preparation process. Stones, roots, hard lumps, and oversized particles should be removed before forming.
If the clay is highly plastic and shrinks heavily, it may need adjustment with suitable non-plastic materials based on testing.
Then, slow down the first drying stage. Newly formed bricks should not move directly into strong airflow or aggressive heat.
Also inspect the forming system. A worn, blocked, or poorly aligned die can create stress lines that later develop into cracks.
Prevention tips
Test each new clay source before full production. Standardize moisture range, mixing sequence, resting time, forming pressure, and early drying conditions.
A properly selected Clay Brick Making Machine can improve forming consistency, but stable material preparation is still essential.
Problem 2: Bricks Warp or Bend During Drying
What you will see
Bricks lose their original shape, bend upward, twist, develop uneven surfaces, or no longer stack correctly. Warping may affect one side or appear across the full brick.
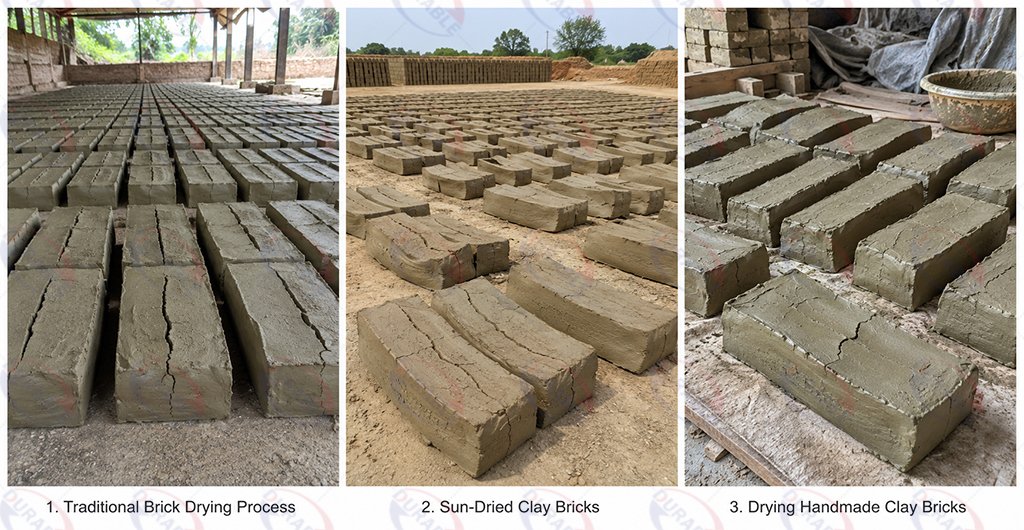
Most likely causes
- Drying is faster on one surface than another.
- Green bricks are placed on uneven pallets.
- Moisture is inconsistent.
- Clay shrinkage is too high.
- Bricks are moved before they have enough strength.
- Airflow is not distributed evenly.
- Brick walls or sections have uneven thickness.
How to fix it
Check whether the bricks receive equal airflow from all sides. Products near doors, fans, windows, or heat sources may dry faster than bricks in the center of the drying area.
Inspect pallets and stacking surfaces. A soft, bent, or uneven pallet can distort a green brick before it develops handling strength.
Reduce the initial drying speed and improve airflow distribution. Fast surface drying can create a hard outer layer while the center remains wet.
If warping continues, review the brick design and clay formula. Uneven wall thickness can create different shrinkage rates inside the same product.
Prevention tips
Use flat pallets, consistent spacing, controlled airflow, and gradual drying. Record which dryer areas produce the most defects, then adjust airflow or loading patterns.
Problem 3: Brick Dimensions Are Inconsistent
What you will see
Brick length, width, height, or cavity dimensions vary between production cycles. Products may not stack evenly, mortar joints become inconsistent, or customers reject bricks outside tolerance.
Most likely causes
- Mold or die wear
- Unstable clay moisture
- Inconsistent feeding
- Forming pressure changes
- Loose mechanical components
- Cutting length changes
- Uneven drying shrinkage
- Poor machine alignment
How to fix it
Begin by measuring green bricks immediately after forming. If the dimensions are already inconsistent, the problem is likely in material feeding, forming, cutting, mold condition, or machine alignment.
If green bricks are consistent but fired bricks vary, drying or firing shrinkage is more likely responsible.
Inspect the mold, die, cutter, guide rails, hydraulic system, feeding mechanism, and mechanical fasteners. Worn surfaces can gradually change dimensions without causing an obvious machine failure.
For larger or growing production, an Automatic Brick Making Machine can help reduce variation caused by manual handling, although raw material control and mold maintenance are still required.
Prevention tips
Create a routine measurement schedule. Check sample bricks after forming, after drying, and after firing. Replace worn molds before dimensional variation becomes commercially unacceptable.
Problem 4: Brick Edges Chip or Corners Break
What you will see
Corners break during demolding, cutting, transfer, stacking, drying, kiln loading, or delivery. The main body may remain strong, but the brick loses its commercial appearance.
Most likely causes
- Green bricks are too soft.
- Moisture is too high.
- Demolding is too aggressive.
- Mold release is poor.
- Conveyors are misaligned.
- Transfer height is excessive.
- Bricks are handled before partial drying.
- Pallet movement is unstable.
- Manual handling is too rough.
How to fix it
Identify the exact point where the damage begins. Do not assume all breakage happens during final transport.
Observe bricks as they leave the forming machine and pass through each transfer point. A small drop, sudden stop, or misaligned conveyor can damage thousands of corners during one shift.
If bricks are too soft, adjust moisture, forming pressure, or waiting time before handling. When sticking occurs during demolding, clean and inspect mold surfaces.
Where manual handling is used, operators should lift and place green bricks instead of sliding or throwing them.
Prevention tips
Reduce transfer heights, align conveyors, maintain pallets, inspect mold release performance, and train workers on green brick handling standards.
A Manual Brick Making Machine may suit small projects, but manual handling quality must be controlled carefully to avoid corner damage.
Problem 5: Lime Blowing or Efflorescence Appears After Firing
What you will see
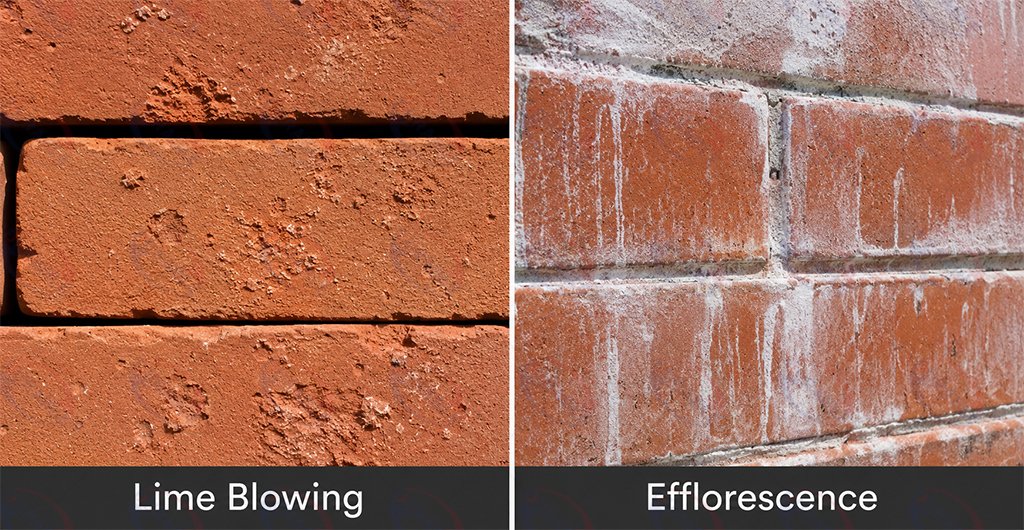
Fired bricks may show popped surfaces, small pits, surface cracks, or white powdery deposits after storage or exposure to moisture.
Lime blowing often appears as local surface damage. Efflorescence usually appears as a white salt deposit on the brick surface.
Most likely causes
- Limestone particles remain inside the clay.
- Soluble salts migrate to the surface.
- Raw clay is not crushed or screened finely enough.
- Chemical composition is not tested.
- Fired bricks absorb moisture after storage.
- Water movement carries salts to the surface.
- Clay source changes without testing.
How to fix it
Separate chemical defects from firing defects first. Bricks that look sound after firing but deteriorate during storage may have lime or soluble salt problems.
If limestone lumps are present, improve raw material crushing and screening. Large lime particles can expand after firing when they react with moisture.
For efflorescence, check the clay source, water quality, soluble salts, and storage conditions. The solution may require raw material adjustment, better drainage, or suitable additives based on testing.
Do not rely only on visual inspection. Clay testing is important when chemical defects appear repeatedly.
| Chemical Problem | Principal Cause | Practical Response |
|---|---|---|
| Lime Blowing | Limestone particles expand after firing | Improve crushing, screening, and clay testing |
| Efflorescence | Soluble salts move to the surface | Check clay, water, storage, and additive options |
| Surface Pitting | Local impurities or chemical reaction | Improve raw material cleaning and quality control |
Prevention tips
Test new clay sources before full production. Keep raw material batches traceable and avoid mixing unknown clay into production without screening.
Problem 6: Bricks Have Low Strength After Firing
What you will see
Fired bricks break under normal handling, fail strength tests, crumble at the edges, absorb excessive water, or produce weak walls.
Most likely causes
- Firing temperature is too low.
- Soaking time is too short.
- Temperature is uneven inside the kiln.
- Clay composition is unsuitable.
- Bricks enter the kiln with excessive moisture.
- Green brick density is too low.
- Organic matter or impurities remain in the clay.
- Kiln loading blocks heat circulation.
How to fix it
Review the full firing curve instead of checking only the maximum temperature. Brick strength depends on heating rate, peak temperature, soaking time, kiln atmosphere, and cooling conditions.
Compare weak bricks from different kiln positions. If defects concentrate near doors, walls, floors, or tightly loaded areas, heat distribution or stacking is likely the problem.
Check green brick density before firing. Poor compaction, unstable extrusion, or air trapped inside the clay can reduce final strength.
Clay testing is essential. Some materials cannot produce the required fired strength without formula or process changes.
Prevention tips
Monitor temperature at several kiln locations, not only one point. Standardize kiln loading and test fired strength regularly instead of relying only on appearance.
Problem 7: Bricks Are Underfired, Overfired, or Uneven in Color
What you will see
Some bricks remain pale, soft, or weak, while others become overly dark, distorted, fused, or brittle. Color may vary widely within the same kiln load.
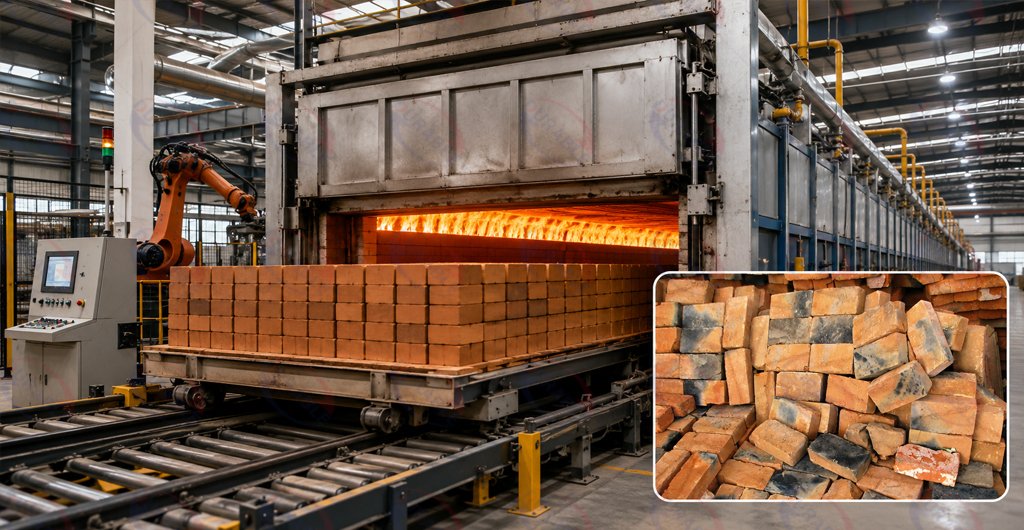
Most likely causes
- Uneven kiln temperature
- Poor burner or fuel distribution
- Inconsistent brick moisture
- Uneven loading density
- Firing cycle changes between shifts
- Unstable fuel quality
- Incorrect kiln atmosphere
- Temperature measurement errors
How to fix it
Separate color variation caused by clay from variation caused by firing. Test bricks from the same clay batch in different kiln positions.
Inspect fuel distribution, airflow, dampers, burners, and stacking channels. Overloaded sections may heat slowly, while open areas may receive too much heat.
Calibrate temperature sensors and compare instrument readings with actual fired results. Operators should follow a documented firing curve instead of relying only on visual judgment.
Prevention tips
Standardize kiln loading, fuel quality, firing records, and sensor calibration. Keep raw material batches traceable so clay-related color changes are not mistaken for kiln failure.
Problem 8: Extrusion or Mechanical Defects Damage Brick Quality
What you will see
Bricks may show internal cracks, S-shaped cracks, laminate cracks, uneven density, rough surfaces, unstable extrusion, or repeated cracks in the same position.
Most likely causes
- Extruder augers or mixing blades are worn.
- Clay is not mixed evenly with water.
- Air remains trapped inside the clay.
- Extrusion pressure is uneven.
- The die creates excessive friction.
- Cutter wires are dirty, loose, or misaligned.
- The discharge belt bends or pulls the wet clay column.
- Machine parts are loose or poorly aligned.
How to fix it
Inspect augers, mixer blades, liners, dies, cutter wires, and transition conveyors. Worn parts often create uneven pressure even when the motor appears to run normally.
If the brick body shows internal cracks, check whether the vacuum system is removing trapped air properly. Air pockets can weaken the green brick and later develop into cracks.
Clean cutter wires and make sure cutting length remains stable. A sticky or vibrating cutter can distort the brick before drying begins.
Also check the transition from extrusion to cutting. Any bending, pulling, or sudden drop can create micro-cracks in the wet clay column.
Prevention tips
Create a preventive maintenance schedule for augers, liners, molds, dies, cutters, conveyors, and vacuum seals. Replace worn parts before they create visible product defects.
For projects using compressed soil rather than fired clay, a Soil Brick Making Machine may follow a different curing and troubleshooting logic.
Problem 9: Fuel Consumption Is Too High
What you will see
Fuel use per thousand bricks increases, kiln cycles become longer, production costs rise, or the kiln struggles to reach and maintain the required temperature.
Most likely causes
- Bricks enter the kiln too wet.
- Kiln insulation is damaged.
- Heat escapes through doors or gaps.
- Loading blocks airflow.
- Fuel quality is unstable.
- Burners are poorly adjusted.
- Waste heat is not recovered.
- Production stops and starts too often.
- Kiln capacity does not match actual output.
How to fix it
Measure moisture before kiln loading. Using the kiln to finish drying green bricks is usually expensive and can increase defects.
Inspect insulation, doors, seals, ducts, burners, and airflow. Heat loss that appears minor can become costly during continuous operation.
Compare fuel use against qualified bricks rather than total bricks loaded. A kiln with low fuel consumption but a high rejection rate may still have a poor real production cost.
Prevention tips
Track fuel use per quantity of qualified bricks. Maintain insulation, standardize moisture before firing, and avoid operating an oversized kiln with small or irregular loads.
Problem 10: Actual Output Is Lower Than Machine Capacity
What you will see
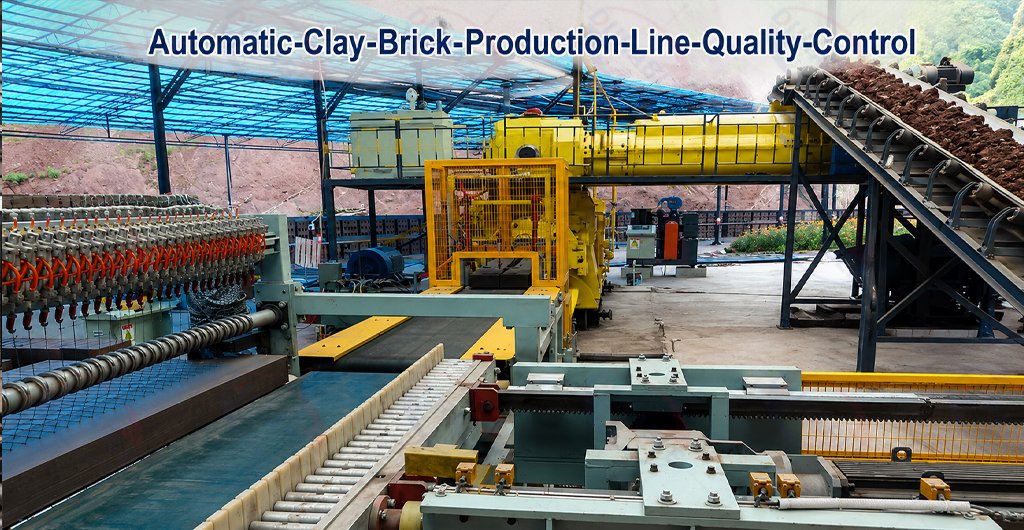
The factory cannot reach expected daily output even though the forming machine has sufficient rated capacity. Operators may face frequent stops, material shortages, slow handling, long drying time, or kiln delays.
Most likely causes
- Machine rating is treated as complete factory output.
- Mixing cannot supply material fast enough.
- Drying capacity is too small.
- Pallets or molds are unavailable.
- Kiln capacity does not match forming output.
- Product changeovers take too long.
- Maintenance stops are frequent.
- Workers are poorly coordinated.
- The product mix is too complex.
How to fix it
Calculate capacity for every production stage.
| Production Stage | Capacity Question |
|---|---|
| Clay Preparation | Can it continuously supply the forming machine? |
| Forming | What is the practical output with your brick size? |
| Handling | Can green bricks be moved without waiting? |
| Drying | How many daily bricks can be dried properly? |
| Firing | Can the kiln process the same daily volume? |
| Packaging | Can finished bricks be cleared fast enough? |
The lowest-capacity stage determines the real factory output.
A broader Brick Making Machine selection should therefore consider mixers, conveyors, molds, pallets, drying, kiln capacity, and handling—not just forming cycles.
Prevention tips
Balance the full line before increasing forming speed. Keep planned capacity below the theoretical maximum so the factory has room for maintenance and normal variation.
Practical Troubleshooting Checklist
When a defect appears, use this sequence before changing multiple settings at once:
- Identify exactly when the defect first becomes visible.
- Separate affected bricks by raw material batch and production shift.
- Measure moisture, dimensions, and strength.
- Inspect molds, dies, cutters, conveyors, pallets, augers, and liners.
- Compare drying positions and kiln locations.
- Review recent maintenance or material changes.
- Change one major variable at a time.
- Record the result before making another adjustment.
Changing moisture, pressure, drying time, and firing temperature simultaneously makes it difficult to identify which action solved or worsened the problem.
For buyers comparing fired clay bricks with unfired soil blocks, a Compressed Earth Block Machine may require a different troubleshooting approach because curing replaces kiln firing.
How to Choose a Reliable Clay Brick Equipment Supplier
Clay brick quality depends on more than one forming machine.
A reliable supplier should understand clay preparation, forming, drying, kiln firing, mechanical wear, and factory layout. This is especially important when defects appear across several production stages.
| Supplier Factor | What You Should Check | Why It Matters |
|---|---|---|
| Raw Material Understanding | Can the supplier evaluate clay plasticity, moisture, and impurities? | Helps avoid wrong equipment selection |
| Forming Experience | Do they understand extrusion, pressing, molds, and dies? | Improves forming consistency |
| Wear Part Support | Are augers, liners, molds, cutters, and seals available? | Reduces downtime |
| Line Design Ability | Can they match feeding, forming, drying, firing, and handling? | Prevents bottlenecks |
| Troubleshooting Support | Can they help analyze defects with photos and process data? | Reduces trial-and-error |
| Export Experience | Can they support packing, shipping, and documentation? | Reduces international purchase risk |
| Installation Guidance | Do they provide setup and operator training support? | Helps shorten startup time |
A supplier should ask for your clay information, target brick size, output, firing method, defect photos, and factory layout before recommending a machine or production line.
To review more equipment categories before planning the full line, you can browse DURABLE’s Products page.
Buyer Project Self-Check List
Prepare these details before asking for a technical recommendation:
- What type of clay do you use?
- Has the clay been tested for plasticity and impurities?
- What is the average moisture content?
- Are there stones, roots, limestone, sand, or other contaminants?
- What brick size and design do you want to produce?
- Are the bricks solid, hollow, perforated, paving, or interlocking?
- What defects are currently appearing?
- At which stage do the defects first become visible?
- What is your required hourly or daily output?
- What drying method do you use?
- What kiln type and fuel source do you use?
- Do you need standalone equipment or a complete line?
- Which country will the equipment be installed in?
The more complete your information is, the more practical the recommendation will be.
Frequently Asked Questions
Why do clay bricks crack during drying?
The most common causes are uneven moisture, excessive shrinkage, fast initial drying, poor clay preparation, and uneven airflow. The first drying stage should usually be controlled more carefully than later drying.
What causes lime blowing in fired clay bricks?
Lime blowing usually happens when limestone particles remain in the clay. After firing, these particles can react with moisture and expand, causing surface popping or cracking.
Why are fired clay bricks weak?
Weak bricks may result from low firing temperature, short soaking time, poor green density, unsuitable clay, excessive moisture before firing, or uneven heat distribution inside the kiln.
Why is actual brick output lower than machine capacity?
Machine capacity usually refers to forming output under specified conditions. Actual factory output may be limited by mixing, material supply, pallets, drying, kiln capacity, labor, maintenance, or packaging.
When should a mold, die, or auger be replaced?
Replace or repair worn parts when dimensions move outside tolerance, release performance declines, cracks repeatedly appear in the same position, extrusion pressure becomes unstable, or adjustments can no longer restore quality.
Final Thoughts
Clay brick production problems rarely come from one single cause.
Cracking, warping, weak firing, lime blowing, high fuel use, and low output often begin earlier than they appear. A defect found after firing may have started with clay preparation, moisture control, forming pressure, drying speed, or kiln loading.
That is why the best solution is not to change several settings at once.
Instead, identify where the defect first appears, classify the problem by production stage, and record the result after each adjustment.
A stable clay brick factory is not built around one machine. Material preparation, forming, cutting, handling, drying, firing, maintenance, and quality control must work as one system.
When these stages are balanced, factories can reduce waste, improve saleable output, and protect daily profit.
About DURABLE
DURABLE supplies clay brick making machines and supporting equipment for small workshops, growing commercial factories, and automated brick production projects.
Our team evaluates clay condition, target brick dimensions, required output, forming method, automation level, factory layout, and downstream process before recommending an equipment configuration.
If your factory is facing cracking, warping, low strength, high fuel use, or low real output, DURABLE can help review your material preparation, forming process, equipment configuration, and production line balance.
Please send your clay information, brick samples, production target, current defect photos, and project country to receive a more practical equipment and process recommendation.